Wondering how to get the most out of your Pinterest pins?
Then it is definitely time for you to enable Rich Pins!
Did you know that Rich Pins are 10x more clickable than normal pins?
All sounds great, but what are they….?
What are Rich Pins?
Pinterest Rich Pins are organic pins that enhance pinners engagement by enriching the pin description and additional premium information associated with it, which is automatically synced from your website to your Pins. If something changes on the original website, the Rich Pin is updated to reflect that change.
Rich Pins automatically sync information from your site, to your Pins. They help you add more info directly to the Pin so people learn more about your products or ideas.
Pinterest for business
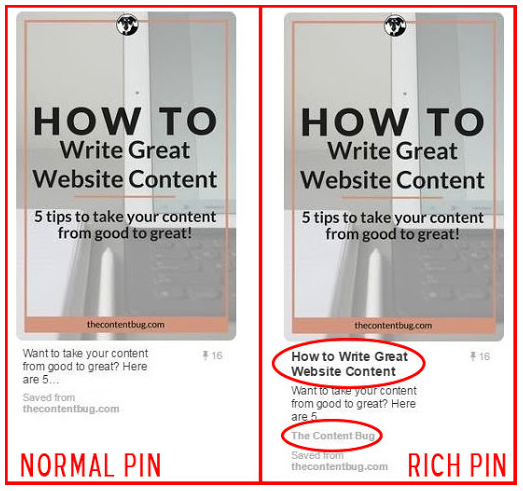
You can identify Rich Pins by the extra information above and below the image on close-up, and the bold title in your feed.

WHAT TYPES OF RICH PINS ARE THERE?
There are three types of Rich Pins depending on what content you share:
- Product Rich Pins – provides up to date product information such as price, size, descriptions and availability directly on the pin itself.
- Article Rich Pins – these are the most common ones that you will see on Pinterest! You will see the article headline, description and the author of the article.
- Recipe Rich Pins – these provide the recipe’s ingredients, amount, prep time, and other information about the preparation directly on the pin itself.
HOW TO APPLY FOR RICH PINS?
I am guessing by now you are pretty convinced to enable Rich Pins on your Pinterest account?
Here’s a simple step-by-step guide for you to follow:
- If you don’t have the Yoast SEO plugin installed on to your WordPress site, do that now. The Yoast SEO plugin will automatically enable meta tags for you, which is what Pinterest requires to enable rich pins.
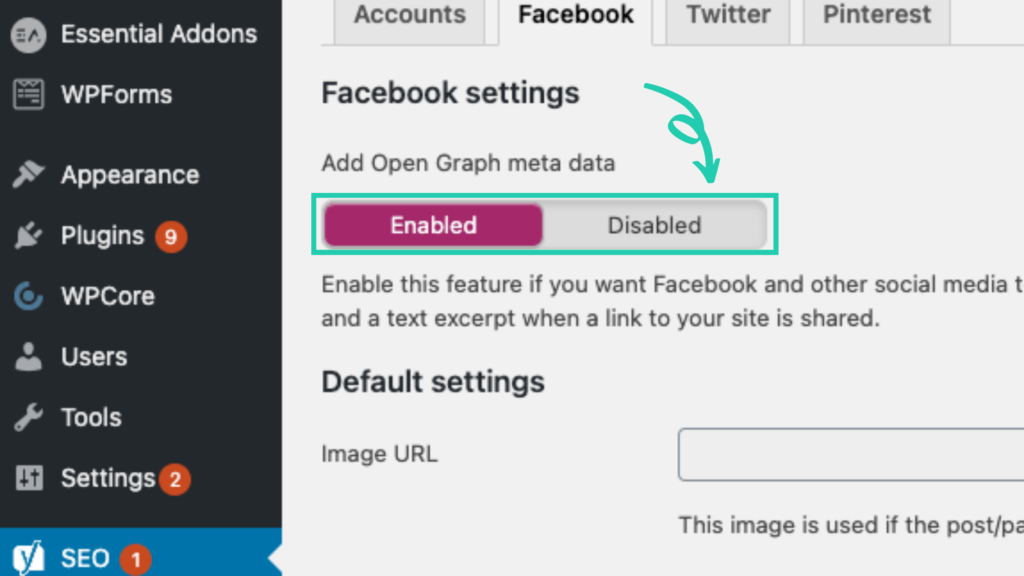
- In the Yoast area of WordPress, under the Social tab, click on the Facebook tab and ensure the ‘Add Open Graph Meta Data’ option is enabled. Save changes.

- Go to Pinterest’s Rich Pin Validator and pick any blog URL, copy and paste it into Pinterest’s Rich Pins Validator.
- A message will appear saying, “Your Pins have been validated!” (If not, go into your blog post meta data and make sure you have it filled in!)
Two things to note:
- You only need apply for one link on your site to enable Rich Pins across your domain.
- To activate Rich Pins you have to Claim your Website first on Pinterest. Follow the simple steps over here.
And there you have it! Rich Pins enabled! Great work!

READY TO TAKE YOUR PINTEREST GAME UP A LEVEL?
Get your free 10 Tips to Go Viral on Pinterest PDF.
These are the exact tips I use with all of my clients to get them firing on all cylinders and making powerful strides forward in their Pinterest marketing!